
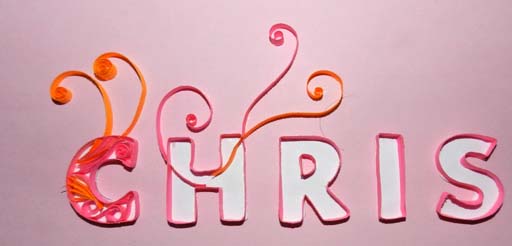
This quilling tutorial is on the new technique I adopted in quilling the monograms , letters or alphabets in my graphic quilled piece CHRIS. This is a new technique, as all the tutorials on quilling monograms that I have seen, give the method I adopted in my previous Quilled Letters Typography piece.
This method would be more relevant for chunky fonts but ensures that your backing card is free of trace marks or print and also enables you get the the letters at any distance you want and hence gives you a lot of flexibility. What's more you don't even need to get outline fonts!!
Method
Outlining
- Choose a font that is chunky and choose the bold font, increase the space between the letters and flip it horizontally to get a mirror image and print it out.
- Print it on the backing paper you want to use for the font.
- Cut out the individual letters with a craft knife. Use the letters for quilling and the paper as a stencil to help you shape the strip for gluing.
- Now turn the letters over. Take a strip, the color of your choice, and start pasting the strip , first along the inner edge and then along the outer edge of the cut-out letters.
- You can use the stencil of the letters you cut to help you shape and fold the strip.
- Once done, you will have outlined text that can be pasted onto your backing sheet in any manner you want.
- No hazzle of measuring on rulers and folding!! Just use the stencil or the cut out for measurement. Where there are sharp bends, fold the strip ahead but remember if you are measuring around the cut out, fold a mm short or you will not be able to paste it on the edge of the cut-out.
- When gluing, use a toothpick and pick up the glue by rolling the toothpick in it and then roll the toothpick along the edge of the strip and ensure that excess glue does not cling to the side of the strip. Allow the strip to dry slightly before laying it on the cut-out.
- If you have pasted the strip slightly inside the edge of the cut-out ease it to the edge by using the other side of the toothpick and rolling it while pushing the strip outwards. Do this before you allow the glue to dry.
- All you need to do is to ensure that the strip is pasted to the edge of the cut-out. If not, don't panic!! You can always cut the excess off or print out the letter and do it again!!
- This method gives you a lot of flexibility and you need not throw out the baby just becoz the bathwater is slightly murky. If one letter gets messed up simply cut out and do a new one.
- The flexibility of this method is unlimited as you can arrange the letter at any position or spacing


- The next step is to glue the letters onto the backing by applying the glue to the back of each letter and pasting it the way you want it.
- Now, to create the design inside the letters, if you want curves, then curl the strip first by pulling the strip between your thumb and forefinger while scraping the nail of your thumb along the side of the strip. This will curl the paper depending on the force applied. The harder , the more the curl. The blunter your nail the better control you will have.
- Measure the curve inside the monogram and cut it ( or use the stencil), then paste it and build up your design.
- If you want the curve to start inside the letter and continue outside, create the whole curl or swirl that you want , then position the curve over the letters where you want it, cut it where it intersects the letter outline and paste the portion which comes inside the lettering first, then paste the portion outside taking care the curve looks continuous. Do not squash the curl/swirl while working as you will loose continuity.
- If you want to adjust the curve after pasting use a toothpick to nudge the strip into shape before it dries completely.
- Work with forceps and keep your finger clean.
- Complete the ones extending out of the lettering first before you fill up the letters that way you can correct mistakes and cover them up with filler strips.
- If you want sharp edges at the bends, try scoring the line and folding along the line.
- If you want a dimensional design, then quill the background design first and paste the letters on top.
- You can also use pegs to elevate some of the letters, your choices are endless.
- Lastly a humble request to those who use my technique, please give a link to my blog so that others may learn too.


0 nhận xét:
Đăng nhận xét