Hiển thị các bài đăng có nhãn typography. Hiển thị tất cả bài đăng

Chủ Nhật, 30 tháng 12, 2012

Quilled Typography quilled words - New Year Wishes


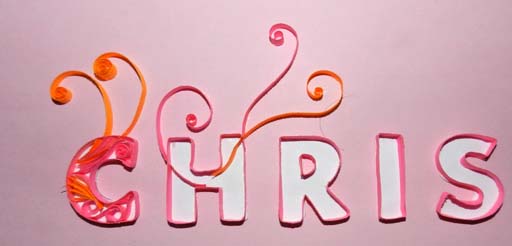
My final offering for the year is this quilled new year greetings to all my followers and friends. I have posted a couple  of quilled typography or quilled words before . My first attempt at quilling  letters was called "Divine" which came out rather nicely and then I followed it up with 'Chris" for which I used my own method.

For this one I have used simple graphic quilling in which I have become quite proficient. Hence I used the rather  intricate looking Baroque Script which font I downloaded free off the net. I am quite fond of curly script and have used strips folded in half  to create the outline font.

I have bordered it with squares with galaxy centers. You can find the instructions on how to make them , here. I think they look far better than the usual squares with coil centers. I put in the rose as the last bit of space was inadequate for a square so I needed to do something to fill the space. I'm quite proud of the way it turned out. It looks rather like a yummy cake!! Well someone who makes cakes can try out this design too!!

In the new year may you

Always remember to forget
The troubles that passed away
But never forget to remember
The blessings that come each day

May joy and peace surround you
Contentment latch your door
And happiness be with you now
And bless you evermore


 Thank you all for warming my heart with all your kind and wonderful comments. I hope you will continue to travel with me through the coming years and to all those who drop by, please join me and journey with me and together we will all discover all that is thrilling about quilling.

Thứ Tư, 12 tháng 9, 2012

Quilling Tutorial New Technique - Graphic quilling monograms, quilling letters, quilling words


This quilling tutorial is on the new technique I adopted in quilling the monograms , letters or alphabets in my graphic quilled piece CHRIS. This is a new technique, as  all the tutorials on quilling monograms that I have seen, give the method I adopted in my previous Quilled Letters Typography piece.

This method would be more relevant for chunky fonts but ensures that  your backing card is free of trace marks or print and also enables you get the the letters at any distance you want and hence gives you a lot of flexibility. What's more you don't even need to get outline fonts!!

Method

Outlining
  1. Choose a font that is chunky and choose the bold font, increase the space between the letters and flip it horizontally to get a mirror image and print it out. 
  2. Print it on the backing paper you want to use for the font. 
  3. Cut out the individual letters with a craft knife. Use the letters for quilling and the paper as a stencil to help you shape the strip for gluing.
  4. Now turn the letters over. Take a strip, the color of your choice, and start pasting the strip , first along the inner edge and then along the outer edge of the cut-out letters.
  5. You can use the stencil of the letters you cut to help you shape and fold the strip. 
  6. Once done, you will have outlined text that can be pasted onto your backing sheet in any manner you want.
  7. No hazzle of measuring on rulers and folding!!  Just use the stencil or the cut out for measurement. Where there are sharp bends, fold the strip ahead but remember if you are measuring around the cut out, fold a mm short or you will not be able to paste it on the edge of the cut-out.
  8. When gluing, use a toothpick  and pick up the glue by rolling the toothpick in it and then roll the toothpick along the edge of the strip and ensure that excess glue does not cling to the side of the strip. Allow the strip to dry slightly before laying it on the cut-out.
  9. If you have pasted the strip slightly inside the edge of the cut-out ease it to the edge by using the other side of the toothpick and rolling it while pushing the strip outwards. Do this before you allow the glue to dry.
  10. All you need to do is to ensure that the strip is pasted to the edge of the cut-out. If not,  don't panic!! You can always cut  the excess off or print out the letter and do it again!!
  11. This method gives you a lot of flexibility and you need not throw out the baby just becoz the bathwater is slightly murky. If one letter gets messed up simply cut out and do a new one.
  12. The flexibility of this method is unlimited as you can arrange the letter at any position or spacing

Filling The Monograms
  1. The next step is to glue the letters onto the backing by applying the glue to the back of each letter and pasting it the way you want it.
  2. Now, to create the design inside the letters, if you want curves, then curl the strip first by pulling the strip between your thumb and forefinger while scraping the nail of your thumb along the side of the strip. This will curl the paper depending on the force applied. The harder , the more the curl. The blunter your nail the better control you will have.
  3. Measure the curve inside the monogram and cut it ( or use the stencil), then paste it and build up your design.
  4. If you want the curve to start inside the letter and continue outside, create the whole curl or swirl that you want , then position the curve over the letters where you want it, cut it where it intersects the letter outline and paste the portion which comes inside the lettering first, then paste the portion outside taking care the curve looks continuous. Do not squash the curl/swirl while working as you will loose continuity. 
  5. If you want to adjust the curve after pasting use a toothpick to nudge the strip into shape before it dries completely.
  6. Work with forceps and keep your finger clean.
  7. Complete the ones extending out of the lettering first before you fill up the letters that way you can correct mistakes and cover them up with filler strips.
  8. If you want sharp edges at the bends, try scoring the line and folding along the line. 
  9. If you want  a dimensional design, then quill the background design first and paste the letters on top. 
  10. You can also use pegs to elevate some of the letters, your choices are endless. 
  11. Lastly a humble request to those who use my technique, please give a link to my blog so that others may learn too.

Thứ Sáu, 7 tháng 9, 2012

Graphic Quilling -Quilled Monogram

I posted quilled monograms or quilled letters in an earlier post where I only outlined the letters or monograms. This time,  not only did I want to quill inside the fonts, but I also wanted to make the the letter outline to cut through  so that a curve which began inside the font, continued outside to depict overlap.

In my previous vector art post, I tried this and was not as successful as I would have liked, but this time I think I figured out how to do it right and hence the transition outside looks much smoother.
However, since I can only get printer paper,  the curves don't hold their shape as it would, if I could get my hand on thicker colored paper.

Didn't want to clutter the outside with too  many swirls as it would detract from the quilled letters.

 I discovered a way that, for me, is easier than sticking the strips on the outline of the lettering, which in my case always ends up making the word look crooked!!  Click here for link to the tutorial.

Thứ Hai, 6 tháng 8, 2012

Quilled Letters or Typography

I have always been awestruck by quilled letters, monograms and words, so I finally picked up the courage to try it and here are the results. Well, not too bad for a first attempt. Actually I quite like it. Sort of looks divine in its own way.

I did struggle to get the strip stuck properly on the printed letters. Guess I should have opted for an easier font. Anyway, on hindsight fonts like Gisha or Aharoni may be easier to quill.

How was it done??  Well..... just printed the letters and stuck the strip on top using a toothpick to apply glue on the strip and not on the backing. Had to do it bit by bit and hold it down till it dried a bit. I just picked the design out of the hat. Made it up as I went along.

 This was my attempt at quilling script. I found it easier than letters with sharp edges as those need precision folding of the strip, but my glue was not good enough and the letters kept coming 
out after all the time I spent gluing a specific section. For this one I pasted red, white & red and quilled the letters.

This was a narrower script I tried out. I think it is called sloop. I have tried to use multi-strip method here to get the double line effect. The flowers are made using continuous strip.

Thứ Ba, 17 tháng 7, 2012

Quilled Monogram Letter - Tutorial

Visit   http://www.craftastical.com/2010/05/tutorial-quilled-monogram-letter.html

Labels

abstract art Accessories Adult English afghan afghan stitch AGULHAS Amigurumi amirugumi applique Art Árvore de Natal em croche baby crochet Baby Dress baby knitting Baby learn bag Bags BAKTUS Ballet Bun Cover balloons BARRADOS basic shapes Bead Beads Bear Ear Hat BEBÊS beehive quilling belts Berry Birds blanket BLUSAS BOINA BOLEROS BOLSAS books BORBOLETAS bows boxes bracelet Butterfly CACHECOL CACHECOLAR cake candles candy Candy Cane card Cards cartoon carving carving fruit carving fruits CASACO INFANTI CASACOS CASAQUINHO EM CROCHE CASAQUINHO EM TRICO CASAQUINHO PARA BEBÊ CHAPEU Christmas quilling clay COLAR COLAR DE FLORES COLETE coloring CORDÃO CORUJUINHAS crafts CROCHE COM SAQUINHOS PLASTICOS CROCHE IRLANDES crochet Crochet Geek crochet pattern cross stitch Curtain cutting paper DECORAÇAO Dicionário de Trico - Inglês/Portugues Doily Doll Dolls - Búp bê drawing Drawing - Vẽ dress earring Easter ECHARPE edging Embroidery Embroidery - Thêu ENXOVAL PARA BEBÉ ESTOLAS fabric FAIXA PARA CABELOS fashion Felt Floral arrangements - Cắm và bó hoa FLORES Flower flower arrangement flower frame flowers crochet Flowers crochet - Móc hoa Folding boxes - Gấp hộp Folding paper FOLHAS food food decor FREE FORM frustration Funny Galaxy Stitch Gang tay - Tất garden gel grips Giầy - Dép gift Gifts glass Gói quà - gấp nơ GOLINHAS Google+ GORRO Gối cho bé GRÁFICOS Granny Square Graphic Quilling hair clip hats Hats - Mũ Heart Hexagon holiday craft holiday crafts home and garden Home decor - Trang trí nhà Hook Insect Itunes Jesus Jesus Christ jewelery jewelry kirigami Knit knitting knitting pattern knot Knot - Tết dây Làm đẹp làm đồ chơi từ gỗ landscape LEAVES Log Cabin Square LUMINÁRIAS LUVAS LUVINHAS PARA BEBÊ Magazine make up making flower making flowers Making toys Manta MANTA PARA BEBÊ MANTA PARA SOFÁ MEUS MOMENTOS MEUS TRABALHOS mittens Móc đường riềm Móc khăn trải bàn motif Multi-strip Multiples Nail art Nature Scenery necklace Nghệ thuật Nghệ thuật cắt giấy Nghệ thuật vẽ trên kính Nhà đẹp Origami Pachwork painting Painting - Sơn màu PANTUFAS PAP Paper paper cut Patchwork PELERINE pictures Pillows Pillows - Gối plastic Play and learn for baby POLAINA poncho Popcorn puff stitch pumpkin cap QUADRADO Quilled animals quilled art quilled berries Quilled design quilled flowers quilled hollow egg quilled leaves Quilled petal Quilled Picture quilled portrait Quilling paper Quilt RECEITA RECEITA CULINÁRIA RECEITA DE PONTOS recycle recycling RENDA DE PELO DE CABRA repair work ribbon rings rugs SACOLAS SAIAS DE CROCHE SANDÁLIAS EM CROCHÊ SAPATINHOS SAPATINHOS PARA BEBÊ Scarf scarves Scarves - Khăn sewing sewing detail shawls shoes and sandals silhouette Singing skirt snood Snowflake soap socks SQUARE Strawberry SUÉTER sweater Swiffer Sweeper Cover TABELAS DE MEDIDAS DE TRICO E CROCHE tablecloths TAPETES. RECEITA TENIS PARA BEBÊ Thank you tip tips TOALHAS TOUCAS TOUCAS PARA BEBÊ TRICO TÚNICA tunisian Tutorial Tutorial video typography underwear Valentine's day Valentines Day vector art Video VÍDEO video tutorial weaving wedding wood XALE YouTube