
Today's tutorial is about what those star quillers discover, but never tell you, about making basic shapes with centers that look like the galaxy swirls with unwinding arms, instead of the usual, boring, spiral centers. This is the technique I discovered while experimenting with basic shapes. I have been meaning to do this for a while now but never got down to it.
I have never seen any instructions on how to get specific designs at the center of your shapes, so this tutorial is to fill that gap.
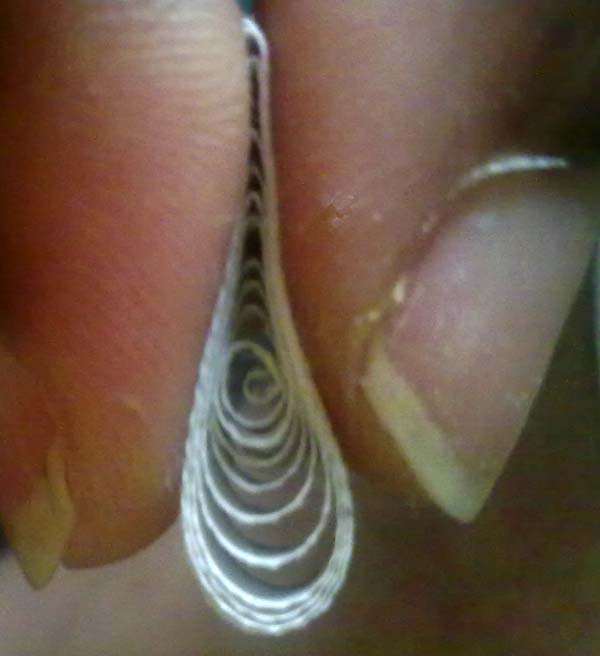
The first step is of course to get well balanced loose coils. There are several tips here.
Once you have got good, loose coils, you can create center whirls in 3 ways.
Center Designs
1. Center remains spiral.

2. Center is like a teardrop with one side pinched.

3. Center is like a marquee.

Once pinched, you will find that each pinched circles will whirl to one side till it gets snagged. So if you want the coils to look good, make sure your initial coil unwinds equidistant .
Making The Shapes
Tear Drop

1. Take a loose coil and pinch the outer coils while you hold the inner coil to the middle between thumb and forefinger of the other hand.
2. Take a loose coil, push the centre coils to the top edge and then pinch them all making sure you only pinch the top half of the coils so that each coil is a tear drop. Just push all the coils to the top and pinch between the ball of the thumb and forefinger to the centremost coil. Then push the center coils to the middle and gently twist the swirls to lie on the side. Do not force it.
3. Press the coils in the middle and bring you thumb and forefinger closer towards the top part of the coil. Then allow the coils to unwind and turn to the side. If required gently turn it to the natural side.

Most of the problems with basic shapes is that they lose the inner design as they continue to wind/unwind, especially if the coils are uneven. By helping it gain equilibrium you are making sure that they will not change shape over time. You can add a tad of glue where the coils are snagged .
Marquee

1. Adopt the same method as in 1 above, and then whilst still holding the middle coils pinch the bottom outer coils.
2. Do the same as in 2 above. Push the pinched center coils to the middle and allow them to turn or coax them gently so that they lie naturally to the side creating a whirl (wind it to equilibrium). Than pinch the outer coils at the bottom to form the marquee leaving a few middle coils unpinched.
3. Follow 3 above and make a teardrop, then let it wind and settle or wind it to equilibrium, then hold the center coils in the middle whilst you pinch the outer coils at the bottom.
Triangle

1. Make a teardrop as in 1. Whilst holding the centre coils with your other hand, flatten the bottom coils and pinch into a triangular shape.
2. Make a teardrop as in 2 and allow wind to equilibrium whilst pushing it to the centre. Whilst holding the centre, pinch the outer coils at the bottom to form a triangle and then gently twist the inner coils in the direction of the wind to give you a nice galactic swirl in the middle.
3. Make a teardrop as in 3 and then follow step 2 above.
Square

1. Whilst holding the inner coils pinch the top and bottom of the outer coils. Then press the two pinched ends between your thumb and forefinger and with the other hand pinch the outer coils of the two sides to make a square then arrange the centre coil in the middle.
2. Make a marquee as in step 2 . Then press the two pinched ends inwards between thumb and forefinger and pinch the two sides to make a square. Then wind the centre coils to enhance the swirls if required.
3. Make a marquee as in 3 and then follow the instructions in square 2.
Petal

1. Make a marquee as in 1 and then, whilst holding the centre coils to the middle, push the side opposite the pinch, inwards , with the nail of your forefinger or a toothpick, pinch the side , then pinch the other side to form a fold like an M. Now shape the petal so that the sides are curved.
2. Make a marquee as in 2 and allow unwind, then follow the same procedure as above. Arrange the swirl in its natural direction to prevent further unwind.
3. Make a marquee like in 3 , allow unwind and follow the steps in 1 above . Arrange the swirl in its natural swirl to prevent further unwind.
The secret of getting galaxy swirls is to pinch and allow the natural unwind to take place. Then pinching the other sides as required. It should also be noted that in some shapes, the tear and marquee centers tend to look the same. Hence in such shapes, you can choose the marquee since it is more stable when it unwinds.
Phew!! That was one long tutorial and I sure hope it helps you make much nicer basic shapes.


0 nhận xét:
Đăng nhận xét