
Hi, gang! I've put together a tutorial for a nifty little quilt block that is superb for using up scraps. I love scrap quilts--they're bright, and random, and I don't have to think as hard about it as I would if I were planning out a fancier quilt (which I've never done, by the way--the thought of it intimidates me). Anyway, this quilt block was the product of a fabulously snowy afternoon over Christmas break at my grandma's house in Oakdale, PA. She was very excited to show me how to make this block--I thought it was going to be the more traditional bowtie pattern, but this one is so nifty I thought I'd share. I don't know where she learned it from, so I don't even know how to credit the design. It's probably on the web somewhere, but I don't know what it's called either to look it up. I am a fountain of knowledge, I tell ya--I promise that I know how to make it though, haha.
Puffy Bowtie Quilt Block Tutorial, sewing pattern
OK, let's get started. This is what we'll be making:

I used white as my main fabric, but you could also use black, or any other color that will contrast with your bowtie. I have oodles of these squares made in all different scrappy colors.
Once you decide on your fabrics, you will need to cut 3 squares in the bowtie fabric, and 2 squares in the main fabric. I cut my squares at 3 inches, because that's what Grandma said, and I'm not messin' with Grandma. You could cut these in any size you'd like, but this ends up being a pretty nice size.

Obligatory picture of what you'll need.
First, take one of your bowtie fabrics (mine are red floral), and fold it in half, wrong sides together.
Ignore the black lines--they were seam lines I drew when I was planning on hand-stitching the entire thing. Then I remembered how I am and machine-stitched it like a nice, sane person (not that hand-quilters aren't sane--I just have no idea where they have acquired such patience).
Take a bowtie square, right side up. Put the square you folded in half on top, with the raw edges lined up. I like to keep the raw edges of the folded square to the right side--it helps me keep things straight for a later step. Place a main fabric square right side down on top of this. Pin carefully so the edges are all matched up nice and neat.

If you're using a tone-on-tone fabric make sure of which side is which before you sew (that's more of a note to myself. Because I forgot to do that).
Stitch, using a 1/4 inch seam allowance. You should have something like the below.

Check to make sure everything is just peachy so you're not filling the swear jar later.
Now you're going to repeat. Take your remaining bowtie square right side up, place it against the folded square, and then place your remaining main fabric square right side down (again with the raw edges to the right--it helps me keep the colors straight so they alternate properly in the finished block). You're just going to pretend that the first two squares you stitched together aren't hanging off the bottom.

You can see the fabric from the other block at the bottom.
Stitch. You're going to have a wonky looking sort of thing after, but you'll be getting the idea of where we're headed.

If this was a real bowtie you might think that this is how I would tie it. And you would be correct.
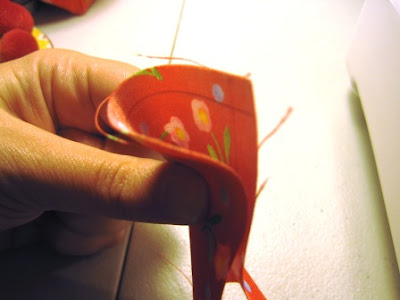
The next part is only slightly fiddly, but you do need to be precise with lining everything up. What you're going to do is open the "pocket" formed by that center square. I simply stick my fingers in and pull it taut. Once everything is smooth and no extra fabric is stuck in the seam I carefully pin. Perhaps some pictures will help with that puzzled look you might have right now:


Make each seam go a different direction to reduce bulk. The left side is lined up proper. My right side will be tended to shortly (as half of it is under my left thumb, haha).
Once it's all lined up and pinned, carefully stitch.

For the extra-strength version you can backstitch at the seams, but I don't.
If everything has gone according to tutorial, you should have THIS:

This is the stage when I press my seams. OK, I WOULD press them at this stage...but I haven't done it yet.


All seams are neat and enclosed.
I have a gallon-sized Ziplock bag crammed full of these right now; here are a few:
These look fun in so many prints, and you can play around a little with patterns and stripes.
I laid mine out to get an idea of placement, and I decided there are going to need to be plain squares in between the bowtie squares. When they are placed one right after the other you sort of lose the look of the block. A bit of plain fabric next to it will make the bowtie pop. I am simply going to take my white fabric and cut squares the same size as my finished blocks (in this case, 5 and 1/2 inches). If I wanted to make life difficult I could sew these on point so the ties are all straight across and connect to one another at the corners...but then I have to worry more about color placement. We'll see how I feel when I get there. Or maybe I'll just say "B'ah! Patchwork totebag!"
So that's it. Pretty simple, eh? As ever, if you have any questions or if I've written something in a confusing way, let me know and I'll do my best to clear it up. Happy quilting!
sweetbeebuzzings.blogspot.com


0 nhận xét:
Đăng nhận xét