Thứ Tư, 31 tháng 3, 2010

New Video Watch Page on YouTube

The new video watch page is being launched on YouTube this evening, so it may be difficult to navigate around the site. The following link will help you become familiar with where everything is located. If you need additional help in finding something, please ask any time.


http://www.google.com/support/youtube/bin/answer.py?&answer=178474

Crochet Challenges - Reading Patterns

Reading patterns can be very challenging.  It may be helpful to have the common crochet abbreviations printed out and handy when you come across different patterns.  I am including a link to my crochet blog with many of the abbreviations. 

Thứ Ba, 30 tháng 3, 2010

Crochet Challenges ?

What do/did you find most challenging about crochet? 

Count your Blessings Tuesday #29

Today I am grateful for:

  • C.  He's awesome.  'Nuff said.
  • 28 days of working out *almost* every day!
  • medicine... I am sure that without it, this would def. be worst.
  • a little boy who reminds me every day to just let go and have fun and "go crazy, go crazy!"
  • two more days until freedom  Spring Break
  • the excitement a photo shoot brings (can't wait 'till Saturday!)

Thứ Hai, 29 tháng 3, 2010

Ever have those moments when...

you have so many thoughts and random things to write about but you sit at the computer and just stare at the screen waiting for the words to come out and they never do?  Yeah, me too.

QUADRADO PERFEITO EM CROCHE


A receita é esta:

faça duas correntinhas e faça três pontos baixo na primeira correntinha.

Vire o trabalho e faça uma correntinha e um ponto baixo no último ponto baixo da carreira anterior pegando na alça de trás do ponto, três pontos baixo no próximo ponto baixo também na alça de trás e um ponto baixo.

Vire o trabalho, faça uma correntinha, um ponto baixo no último ponto baixo da carreira anterior pegando na argola de trás, outro ponto baixo no próximo ponto e três no outro ponto baixo, um em cada um dos pontos até o final da carreira.

Os três pontos baixo no mesmo ponto ficam no meio do quadrado
 

What was your first crochet project?

What was your very first Crochet Project? 

 Mine was a thread snowflake. I threw it away because everything was crooked and the stitches were uneven.  Later I made a shell baby afghan for my son.  The afghan helped me learn some stitch consistency in repeating the same stitch over and over.

I threw a lot of my first crochet projects away because I thought they were ugly. I regret doing that now and wish I would have saved some of them.  I was very hard on myself and felt that everything had to look perfect.  Back then as a "green crocheter", the perfection I was looking for came with a lot of practice. This gave me the stitch consistency making everything look even. 

Chủ Nhật, 28 tháng 3, 2010

ROSA EM TRICO

Estas rosas são bem práticas, você pode utilizá-las para aplicar em blusas. Agulha para tricô n.4,5 Fio compatível com a agulha. Coloque 32 pontos na agulha, deixando uma sobra de fio.


1a. Carreira direito: toda em ponto tricô.

2a. Carreira avesso: arrematar 8 pontos e continuar em ponto tricô.

3a. Carreira direito: toda em ponto tricô.

4a. Carreira avesso: arrematar mais 10 pontos e continuar em ponto tricô.

5a. Carreira direito: toda em ponto tricô.

6a. Carreira avesso: arrematar os 14 pontos finais, deixando uma sobra de fio.

Depois é só fechar a rosa com o fio que sobrou do inicio do trabalho, e aplique as rosas onde desejar com o fio que sobrou do arremate.

PS: Se quiser pode também nas carreiras do direito trabalhar em ponto meia.
 
Tb.do Blog da Rosangela

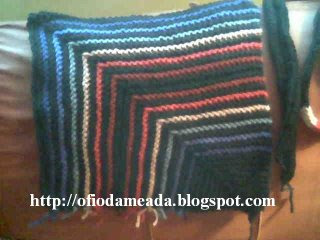
BOLERO DE QUADRADO PERFEITO EM TRICO


- 3 novelos de Cisne Íris
- 1 par de agulhas Tricô Corrente numero 8

Para fazer o quadrado perfeito, primeiro deve ser feito uma conta: Ex: Se o trabalho for feito com 73 pontos, subtrair 73-3=70 pontos, depois dividir 70:2=35 pontos.
A seguir fazer da seguinte maneira:

Colocar 73 pontos na agulha e fazer as carreiras abaixo:
1ªcarreira: tricô
2ªcarreira: 35tricô, 3pontos juntos em tricô, 35tricô.
3ªcarreira: tricô.
4ªcarreira: 34tricô, 3pontos juntos em tricô, 35tricô.
5ªcarreira: tricô.
6ªcarreira: 33tricô, 3pontos juntos me tricô, 33tricô.
7ªcarreira: tricô.
Ir fazendo desta maneira todas as carreiras até sobrar só 3 pontos na agulha, fazer os 3 pontos juntos em tricô e estará pronto o quadrado perfeito. Fazer 2 quadrados e reservar (cada quadrado tem 30cm). O 3ºquadrado, deve ser feito até a metade dos pontos (ficar com 35 pontos e arrematar). Colocar os 2 quadrados e meio conforme desenho abaixo e costurar para formar o bolero.

Aula de Vitória Quintal


Quadrado perfeito em Tricô
Agulha do número que quiser e lã correspondente à agulha.
Para fazer uma amostra do quadrado, coloque 23 pontos na agulha.
Faça sempre uma conta antes de começar a tricotar. Neste caso faça: 23-3 = 20.
20 dividido por 2 = 10.
1a. Carreira Direito: toda em ponto tricô.
2a. Carreira Avesso: 10 tricôs, 3 pontos juntos em tricô, 10 tricôs.
3a. Carreira Direito: toda em ponto tricô.
4a. Carreira Avesso: 9 tricôs, 3 pontos juntos em tricô, 9 tricôs.
5a. Carreira Direito: toda em ponto tricô.
6a. Carreira Avesso: 8 tricôs, 3 pontos juntos em tricô, 8 tricôs.
Continue sempre assim fazendo as diminuições sempre do lado do avesso, até restarem apenas 3 pontos na agulha. Arremate os 3 pontos juntos do lado direito, e terá um quadrado perfeito, com os 4 lados iguais.
Lembre-se que: você é quem determinará o tamanho do seu quadrado, colocando quantos pontos quiser; pode fazer de qualquer tamanho, mas respeitando sempre aquela regrinha de fazer a conta antes de iniciar seus quadrados.


A mesma receita da Rosângela Chicote, mas explicada com mais detalhes.


Thứ Bảy, 27 tháng 3, 2010

BOLO CREMOSO DE CÔCO

Ingredientes:


- 1 lata de leite condensado
- 1 lata de leite (a mesma medida)
- 4 ovos
- 1 colher de sopa de margarina
- 1 colher de sopa de fubá ou milharina
- 3 colheres de sopa de farinha de trigo c / fermento
- 1 vidro pequeno de leite de coco
- 50g de coco ralado

Bata todos os ingredientes no liquidificador menos o coco ralado, que deve ser colocado por ultimo.
Coloque em uma forma untada com margarina e enfarinhada. Leve ao forno alto (pré-aquecido) até dourar.

PIZZA DE LIQUIDIFICADOR

Ingredientes
-1 xícara (chá) de leite (200ml)-
1 ovo-
1 1/2 colher (chá) de sal-
1 colher (chá) de AJI-NO-MOTO-
1 colher (chá) de açúcar-
1 colher (sopa) de manteiga sem sal-
1 1/2 xícara (chá) de farinha de trigo-
1/2 colher (sopa) de fermento em pó-
1 xícara (chá) de polpa de tomate (200g)-
1 colher (sopa) de orégano desidratado-
1/2 abobrinha média cortada em rodelas finas-
150g de fatias finas de mussarela
No copo do liquidificador, coloque o leite, o ovo, meia colher (chá) de sal, meia colher (chá) de AJI-NO-MOTO, o açúcar, a manteiga, a farinha de trigo e o fermento, e bata rapidamente, até ficar homogêneo.
Disponha a massa em uma assadeira redonda (30cm de diâmetro), untada e enfarinhada, e leve ao forno médio (180ºC), pré-aquecido, por 20 minutos.
Enquanto isso, em uma tigela, coloque a polpa de tomate, o orégano, o sal e o AJI-NO-MOTO restantes, e misture.
Retire a massa do forno, espalhe metade do molho de tomate, as rodelas de abobrinha e o restante do molho.Cubra com as fatias de mussarela e volte ao forno por mais 20 minutos, ou até que o queijo derreta. Retire do forno e sirva em seguida.

Tempo de preparo: 50 minutos
Dica: após bater a massa no liquidificador, leve-a imediatamente ao forno para que o fermento não perca seu efeito.Variação: substitua a abobrinha pelo recheio de sua preferência.

BOLO DE ABACAXI

Ingredientes:
Massa:
3 xícaras de chá de farinha de trigo
1 colher de sopa de fermento
2 colheres de sopa de manteiga
1 xícara de chá de açúcar
4 ovos
Recheio:
1 abacaxi
2 xícaras de chá de açúcar
1 colher (sopa) rasa de manteiga
1 coco ralado
3 ovos
Cobertura:
açúcar e canela a gosto
Modo de Fazer:
Misturar todos os ingredientes da massa, abra com o rolo e divida em duas partes. Reservar.
Recheio:
Triturar o abacaxi no liquidificador. Numa panela, acrescentar os outros ingredientes e levar ao fogo até secar o caldo. Pré aquecer forno.Utar uma assadeira, forrar com um pouco da massa, Distribuir o recheio e Cobrir com a outra parte da massa. Assar em forno médio. Na hora de servir, cortar em quadrados e passar sem açúcar com canela.

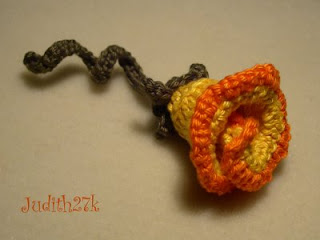
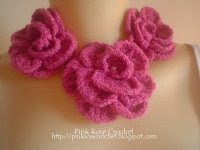
FLORES


Autoras citas nas fotos.

Crochet Sock Monkey


Crochet Sock Monkey

Written by Teresa Richardson

Video Tutorial:  Crochet Sock Monkey

Video Tutorial: Left Hand Crochet Sock Monkey

Skill Level - Intermediate

Abbreviations
HDC - Half Double Crochet
CH - Chain
SL ST - Slip Stitch

SC DEC - Single Crochet Decrease
FSC - Foundation Single Crochet

FHDC - Foundation Half Double Crochet
FDC - Foundation Double Crochet

Materials
Size G/4.0 mm crochet hook
4 ply yarn - 3 colors - Colors of your choice.
Tapestry Needle

Polyester Fiberfill or stuffing of your choice

Stitch Instructions and Definitions
Single Crochet Decrease - This is joining 2 single crochet together and reducing them down to 1 single crochet. You insert the hook through the first stitch, wrap the yarn over the hook and pull the yarn through. There will be two loops on the hook.  Insert the hook through the next stitch, wrap the yarn over and pull it through. Wrap the yarn over the hook and pull through all 3 loops. 


Continual Round - The purpose of the continual round is to eliminate joining and seams.  You can start a continual round on any joined round.  The technique is done by working the first stitch in top of the stitch you would typically join the round. It is creating a jog up. When you come around to the beginning of the next round, you will not have to join.  Most likely there will be increasing on a continual round.  You will want to use a yarn marker to mark the first or last stitch, so you have an idea where to make your increase rounds. 

Yarn Marker - I just use scrap piece of yarn to mark rounds. I have also used paper clips and bread twisty ties.

Time Code is noted in this video on each segment.  You can click on each segment in the written instructions to be taken ahead in the video or you can scroll to the time code.


Arms, Legs and Tail - Make 5   -  Time Code: :29
Bottom Section

Row 1: Work 10 Foundation Single Crochet
Row 2-10: Work a SC in the first stitch. Work in the loop below the stitch to create the rib effect for each of the 8 stitches between. Work the last single crochet through the top of the stitch.
Working on the inside: To join, sew though the same loop below the stitch, to push the top stitch forward to complete the rib look. Sew the seam across. Gather the opening on one end. Sew and secure. Turn right side out when complete.

This is an alternative to the foundation stitches.
Bottom Section 2: Chain 3, join, 
Round 1: chain 1, work 10 SC through the loop, do not join. 
Round 2-10: work 1 SC in each stitch around.


Upper Section 
Attach the new color anywhere along the top of the row. 
Round 11: Work 10 single crochet evenly around. Do not join and work in a continual round. The first single crochet  of round 12, will be right in the top of the round 11 single crochet.
Round 12-30:  Work 1 SC in each stitch around.
Lightly stuff each segment.

Body - Time Code 9:56
Chain 4, join
Round 1: Ch 1, work 9 SC through the loop, do not join.
Round 2:  Work 2 SC in each stitch around.  (18 Single Crochet total)
Round 3: Work 1 SC in each stitch around. (18 Single Crochet total)
Round 4: *Work 1 SC, work 2 SC, continue around from * (27 Single Crochet total)
Round 5-17: 1 SC in each stitch around.  (27 Single Crochet total)
Round 18: *1 SC, 1SC DEC, continue around from * (18 Single Crochet total)
Round 19: 1 SC in each stitch around.  (18 Single Crochet total)
Round 20: *1 SC, 1 SC DEC, continue around from * (12 Single Crochet total)
Stuff with fiberfill  on round 19 and sew the top shut upon completing round 20.


Head  - Time Code 23:29
Chain 4, join
Round 1: Ch 1, work 9 SC through the loop, do not join.
Round 2:  Work 2 SC in each stitch around.  (18 Single Crochet total)
Round 3: Work 1 SC in each stitch around. (18 Single Crochet total)
Round 4: *Work 1 SC, work 2 SC, continue around from * (27 Single Crochet total)
Round 5:  Even work 5 single crochet increases around (32 Single Crochet total)
Round 6-18: 1 SC in each stitch around. (32 Single Crochet total)
Round 19: *1 SC, 1 SC DEC, continue around from *, 
Round 20: 1 SC in each stitch around.
Round 21: *1 SC, 1 SC DEC, continue around from *
Stuff head between round 19 and 20.  Sew head shut upon completing round 21.


Snout/Mouth - Time Code 18:08
Round 1: Work 1 FSC, FHDC, FDC, FDC, FHDC, FSC,  
Working down the opposite side. Work 2 single crochet in the FSC stitch. Work a HDC opposite the FHDC, work 1 DC opposite each FDC. HDC in the next, 2 SC in the last stitch, join. 
Round 2: Ch 1, work 1 SC in each stitch across, work 3 SC in the mouth corner for the increase, work 1 SC in each stitch across, Work 3 SC in the mouth corner for the increase, join with the beginning stitch. Cut the yarn and change color.
Round 3: Attach new color with a slip stitch close to mouth corner. There will be a top and bottom to the snout. You may want to attach a yarn marker to mark the top.  
Top: Work 1 SC, 2 SC in next stitch, 1 SC, 2SC in next stitch, 1 SC, 2 SC in next stitch, 1 SC, 2 SC in next stitch. Continue around to the bottom with 1 SC in each stitch.
Bottom:  Work 2 SC in the same stitch  close to the mouth corner.  Work 1 SC in each stitch across.  Work 2 SC in the last stitch and 1 SC in the remaining stitches. Join with the beginning stitch.
Round 4: CH 1, Work 1 SC in each stitch around, join with the beginning stitch.
You will embellish the mouth and nose features before attaching to the face.  Align the bottom of the snout close to round 5 on the head.  Sew the bottom of the snout to the face before adding the stuffing.


Attaching Segments - Time Code 36:51


Ears - Make 2 - Time Code
CH 3, join,
Round 1: CH 1,Work 6 SC, join.
Round 2: CH 1,Work 2 SC in each stitch around, join.
Round 3: CH 1,Work 1 SC in each stitch around, join.


Eye - Make 2 - Time Code - 38:53
Chain 2, Work 3 single crochet in the second chain from the hook. Join with the beginning stitch. Cut off a long length of tail for attaching to face.  Align and sew the eyes to the face.  Use the extra tail to sew on eyebrows and any extra features. Know and secure the tail. Sew in and cut it off.
   

Sock Monkey Index

Rainbow and Star Crochet Applique'


Crochet Rainbow & Star

Written by Teresa Richardson

Video Tutorial: Star Crochet Rainbow Applique'

Video Tutorial:  Left Hand Star Crochet Rainbow Applique'

Skill Level - Easy

Abbreviations
HDC - Half Double Crochet
CH - Chain
SL ST - Slip Stitch

FSC - Foundation Single Crochet

Materials
Size I/5.5 mm crochet hook
4 ply yarn
Tapestry Needle

Stitch Instructions and Definitions
Single Crochet Decrease -
insert the hook through the first stitch,  wrap the yarn over, pull it through, insert the hook through the next stitch, wrap the yarn over, pull it through, there are 3 loops on the hook, wrap the yarn over and pull through all 3 loops to complete the Single Crochet Decrease.

Foundation Single Crochet - This stitch eliminates the chain. Chain 2, insert the hook through the 2nd chain from the hook, wrap the yarn over your hook, pull it through, wrap the yarn over your hook, pull through 1 loop, wrap the yarn over your hook, pull through both loops to complete the first stitch. The foundation stitches are worked vertically.  Insert your hook below the 2 loops to the left of your work, if you are right handed, to the right if you are left handed. Wrap the yarn over your hook, pull it through, wrap the yarn over your hook, pull through 1 loop, wrap the yarn over your hook, pull through both loops to complete the stitch. 


Star

Chain 4, join with the beginning chain.
Round 1: CH 1, *Work 2 SC through the loop, CH 2, Complete 5 times total from *. join with the beginning  stitch. SL ST to the chain 2 space.
Round 2: CH 1, * Work 2 SC, CH 2, 2 SC in the same CH 2 space, Work a single crochet decrease, insert the hook through the same CH 2 space, wrap the yarn over, pull it through, insert the hook through the next CH 2 space, wrap the yarn over, pull it through, there are 3 loops on the hook, wrap the yarn over and pull through all 3 loops to complete the Single Crochet Decrease. Complete 5 times total from *, join with the beginning stitch. SL ST to the chain 2 space.
Round 3: CH 1, * Work 3 SC, CH 2, 3 SC in the same CH 2 space, Work a SC DEC through the first SC next to the chain and the last stitch on the opposite side, skipping the stitches between. Complete 5 times total from *, join with the beginning stitch. SL ST to the chain 2 space.

Cut off a long length of tail for sewing the star.

Rainbow
Note: You can work increase stitches on any row of the rainbow to give it more of a curve.

Row 1: Work 20 foundation single crochet on the first row. (see description above) Cut the yarn and change color.
Row 2: Attach the new color with a slip stitch. Work 1 SC in each stitch across. Cut the yarn and change color.
Row 3: Attach the new color with a slip stitch. Work 1 SC in each stitch across. Cut the yarn and change color.
Row 4: Attach the new color with a slip stitch. Work 1 SC in a few stitches, work a single crochet increase. Evenly work 4 or 5 single crochet increases. Cut the yarn and change color.
Row 5: Attach the new color with a slip stitch. Work 1 SC in each stitch across. Cut the yarn and change color.
Row 6: Attach the new color with a slip stitch. Work 1 SC in each stitch across. Cut the yarn and change color.


Thứ Sáu, 26 tháng 3, 2010

Date Night @ the Aquarium

For our four year anniversary we went to the National Aquarium in Baltimore for their quarterly Date Night.

Playing around at Urban Outfitters... they really should clean that mirror.

This screams BALTIMORE.  See how hot my hubby looked?  That's a paisley tie!

The dress I'm wearing is really cute but I had to cover it up with a cardigan... COLD!  Like the headband?

Last anniversary we took a photo like this one at the harbor.... I like this one too ;)

In case you didn't know where we were at...

This is in front of the aquarium... I love these two photos... same exact spot but different focusing points... water...

branch with buds..... : )   It appears as if by magic... or just my camera.

The view from the aquarium :)

The music at the aquarium.... he was awesome!

Great company... T and A.  They were pretending they got engaged.... only T wishes it wasn't pretend.

This is A.... he's like this... all the time (with or without alcohol).

C checking out the exhibits... as you can tell, I was checking out the "exhibit"

Lovely view of the harbor with C :)

This is how empty the aquarium seemed to us... it seemed like we were the only ones there and it was AWESOME!

My favorite fish :)

Thứ Năm, 25 tháng 3, 2010

FLORES FLORES FLORES


Labels

abstract art Accessories Adult English afghan afghan stitch AGULHAS Amigurumi amirugumi applique Art Árvore de Natal em croche baby crochet Baby Dress baby knitting Baby learn bag Bags BAKTUS Ballet Bun Cover balloons BARRADOS basic shapes Bead Beads Bear Ear Hat BEBÊS beehive quilling belts Berry Birds blanket BLUSAS BOINA BOLEROS BOLSAS books BORBOLETAS bows boxes bracelet Butterfly CACHECOL CACHECOLAR cake candles candy Candy Cane card Cards cartoon carving carving fruit carving fruits CASACO INFANTI CASACOS CASAQUINHO EM CROCHE CASAQUINHO EM TRICO CASAQUINHO PARA BEBÊ CHAPEU Christmas quilling clay COLAR COLAR DE FLORES COLETE coloring CORDÃO CORUJUINHAS crafts CROCHE COM SAQUINHOS PLASTICOS CROCHE IRLANDES crochet Crochet Geek crochet pattern cross stitch Curtain cutting paper DECORAÇAO Dicionário de Trico - Inglês/Portugues Doily Doll Dolls - Búp bê drawing Drawing - Vẽ dress earring Easter ECHARPE edging Embroidery Embroidery - Thêu ENXOVAL PARA BEBÉ ESTOLAS fabric FAIXA PARA CABELOS fashion Felt Floral arrangements - Cắm và bó hoa FLORES Flower flower arrangement flower frame flowers crochet Flowers crochet - Móc hoa Folding boxes - Gấp hộp Folding paper FOLHAS food food decor FREE FORM frustration Funny Galaxy Stitch Gang tay - Tất garden gel grips Giầy - Dép gift Gifts glass Gói quà - gấp nơ GOLINHAS Google+ GORRO Gối cho bé GRÁFICOS Granny Square Graphic Quilling hair clip hats Hats - Mũ Heart Hexagon holiday craft holiday crafts home and garden Home decor - Trang trí nhà Hook Insect Itunes Jesus Jesus Christ jewelery jewelry kirigami Knit knitting knitting pattern knot Knot - Tết dây Làm đẹp làm đồ chơi từ gỗ landscape LEAVES Log Cabin Square LUMINÁRIAS LUVAS LUVINHAS PARA BEBÊ Magazine make up making flower making flowers Making toys Manta MANTA PARA BEBÊ MANTA PARA SOFÁ MEUS MOMENTOS MEUS TRABALHOS mittens Móc đường riềm Móc khăn trải bàn motif Multi-strip Multiples Nail art Nature Scenery necklace Nghệ thuật Nghệ thuật cắt giấy Nghệ thuật vẽ trên kính Nhà đẹp Origami Pachwork painting Painting - Sơn màu PANTUFAS PAP Paper paper cut Patchwork PELERINE pictures Pillows Pillows - Gối plastic Play and learn for baby POLAINA poncho Popcorn puff stitch pumpkin cap QUADRADO Quilled animals quilled art quilled berries Quilled design quilled flowers quilled hollow egg quilled leaves Quilled petal Quilled Picture quilled portrait Quilling paper Quilt RECEITA RECEITA CULINÁRIA RECEITA DE PONTOS recycle recycling RENDA DE PELO DE CABRA repair work ribbon rings rugs SACOLAS SAIAS DE CROCHE SANDÁLIAS EM CROCHÊ SAPATINHOS SAPATINHOS PARA BEBÊ Scarf scarves Scarves - Khăn sewing sewing detail shawls shoes and sandals silhouette Singing skirt snood Snowflake soap socks SQUARE Strawberry SUÉTER sweater Swiffer Sweeper Cover TABELAS DE MEDIDAS DE TRICO E CROCHE tablecloths TAPETES. RECEITA TENIS PARA BEBÊ Thank you tip tips TOALHAS TOUCAS TOUCAS PARA BEBÊ TRICO TÚNICA tunisian Tutorial Tutorial video typography underwear Valentine's day Valentines Day vector art Video VÍDEO video tutorial weaving wedding wood XALE YouTube