Thứ Năm, 8 tháng 9, 2011

Crafts for summer: sewing dress for kids


Sewing patterns

15 mins. to a little girls' ruffle dress

i bought some ruffle fabric at the fabric district in LA
to make dresses for my two little girls.
they haven't really liked what i've made for them so far
and doesn't wear them unless i force or bribe them,
(which is the reason why i don't sew much for them)
so i was hoping this would be the first that they'd approve of.
i bought 1 yard each of light pink and cream.

and 30 mins. later, i had two dresses made for my two girls!

what you'll need:
2/3-3/4 yard of ruffle fabric per dress
matching thread
scissors
estimated time: 15 mins. per dress
project cost: reasonable
skill level: beginner
1. fold the ruffle fabric so there's two layers and lay a dress flat on top.
2. trace the dress with 1/2"-3/4" extra all around and cut the fabric.
(i cut mine a lot longer on the bottom so they won't outgrow it so fast. :)
3. put the two layers right sides together and sew the sides and the shoulders closed.
4. double fold(1/4" fold both times) and sew around the neckline and armholes.
(haha, i just noticed i wrote "the armpit area" on the picture.  eh hem, moving on...)
*5. double fold the bottom hem and sew. 
*optional.  i didn't hem the bottom since it won't fray and the ruffles cover the edges anyway.
the after:
my oldest didn't want to take pictures, but my youngest sure did, can you tell?
and i wore my ruffle dress so we can all be matchy matchy to go to church.
tips:
*make sure when you cut the fabric that you're not cutting off the ruffles itself on the edges.
(cut the base fabric underneath the ruffles)
*when you're about to sew, make sure to hold it up right so the ruffles hang down.
*as you're sewing, keep checking so the ruffles are going down and not catch on the wrong side
Source: http://jaynsarah.blogspot.com 

Thứ Tư, 7 tháng 9, 2011

Gift presents for kids: Handmade Teddy Bear Ear Headband

Sewing patterns

Hmm, I think I promised to post the tutorial for the teddy bear ears from the twins birthday party a week ago.  Oops.
Teddy Bear Ear Headband
Without further ado.

Teddy Bear Ear tutorial

Step 1:
Cut out the pieces of felt required:
  • 1 long strip to make a sleeve for the headband - measure the width of the headband, double it and add an extra 5mm for stitching.  Measure the length and do the same.
  • the large part of the ear - Cut a piece of paper to the correct shape and use that as a template.  You will need 4 of these per headband.
  • the small inner section of the ear - as above, however you will only need 2 of these per headband.
Step 2:
Stitch the long sides of the sleeve together using an over-edge stitch (either using the sewing machine or by hand).   Pull the sleeve over the headband, fold the ends over and stitch by hand.
Step 3:
Stitch the inner ear to the outer ear.  Then stitch the back and front of each ear together.  Use a couple of strands of embroidery thread.
Step 4:
Put a small amount of stuffing in each ear.  This is to help the ears stand up and fill them out a little so they don't flop over when stitched to the headband.
Step 5:
Stitch each ear to the sides of the headband.  Stitch as close to the edge of the headband as you can.  If you stitch the back and front of the headbands close together the ear will most likely flop.
And there you have it.
Source: @tonyastaab.com

Flowers gifts: paper crafts for kids

Basket 


1. Of a dense sheet of paper cut out a square of the required size. Rascherchivaem his pencil into 9 equal squares barely perceptible lines.
2. Fold the paper along the lines.
3. Repeat on all sides.
4. Two extreme sides of the big square in the mode 3 of the lines - as shown in the photo - to the internal lines.
5. Fold the basket.
6. Glued side. You can use PVA glue or glue sticks.
7. Cut the handle and decoration for baskets.
Handle baskets equal in length to the side of a large square.
Decorating for the handle an inch in length and width smaller than the pen.
Decorating for the base of the basket can be cut by an attached finished scheme or using a protractor. To do this he measured the resulting angles and sides of the basket and draw a smaller copy.
8. Glue decoration to the handle in the middle.
9. With decorations to the basket.
10. Glue the handle to the basket.
11. Decorate the basket, you can of your choice. For example, you can cut out of colored paper flowers and petals.
12. Glue decorations to the basket.
Finished baskets you can use to pack a small gift or for composition with flowers.
View from above.
Dressing for the basket.
Decoration - flower.Photo:@kids.bcm.ru

Recycling paper: baby making toys

Easter Checkers

Looking for an Easter craft to do with all of those egg cartons that you hoard?  I have just the thing.
paper crafts for kids
Easter game
This is what you will need to make this fun Easter game for the kids:
  • 1 16x16" thick ply wood
  • Paint:  Pink (matte & metallic), Yellow (matte & metallic), green and blue
  • Egg cartons (24 egg cups)
  • Card stock: orange, yellow glitter, pink glitter (2 shades)
  • White pom poms
  • Elmer's glue spots: thin mini and pop-up medium
  • Wiggly eyes
  • Black marker
  • X-Acto knife, scissors, ruler and paint brushes.
To make the bunnies:
Egg carton bunny
Paint the egg cups with the matte pink, once dry, paint a second coat using the metallic paint.  Cut out ears from the glitter card stock, attach the center using the mini glue spots. Poke a hole in the top of the egg cup with the X-Acto knife and insert the ears, attach to the inside of the egg cup using the mini glue spots.  Attach the pom pom tail using the medium glue spots and the wiggly eyes using the mini glue spots.  Draw on the rest of the facial features using a permanent marker.
To make the chicks:
Egg carton chick
As per the instructions for the bunnies.  Substitute pink paint for yellow.  Attach the wings using the medium glue spots and the fuzzy top exactly the same way as you did the bunny ears.  Fold a piece of orange card stock in half, cut out small triangles (beak) and attach using mini glue spots.
Now play, play, PLAY!
Egg carton activity
egg carton crafts
Easter Checker Board
Source: www.tonyastaab.com
Crafty jewelry with wood

 embroidered wood jewelry
IMG_3020
Unique gifts for valentine


IMG_3027
Have I mentioned how much I enjoy selling consignment? It's perfect. I make whatever I want. She takes what she wants. It sits around in a shop rather than in my craft room. If it sells, I get a check in the mail. It's ideal and requires zero trips to the post office.
IMG_3030
So, if you want any of this, swing by Nina and Tom's in Davis, CA.
IMG_3024
If you don't live near Davis but really, really want something, email me at mdhaworth at gmail dot com and let me know.
Oh, and I did a few non-Valentine's things too. They're pins (brooches?).
IMG_3022
They're pretty big (those larger squares on the graph paper are 1 inch)
IMG_3021
I don't know why birds. Or a pear.
IMG_3026
Source: underconstructionblog.typepad.com
Recycling paper: Kids craft ideas

Recycled Heart Craft


I ran across a great tutorial on how to make a heart wreath and it got my brain jogging.  I remembered a snowflake craft that I had seen in a magazine, so I modified it for hearts.
What came out was this cool ornament looking thingy.  Doesn’t that sound enticing?
IMG_2757
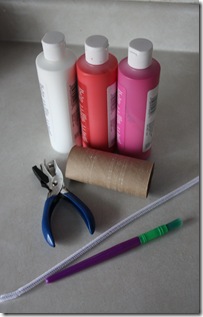
You will need a toilet paper roll, paint, pipe cleaner, hole punch, paint brush, and scissors.
IMG_2763

IMG_2739
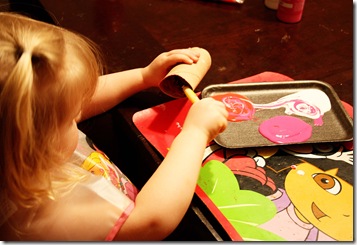
Have your kids paint the toilet paper roll.  Paint it inside and out.  While the paint is wet you can add glitter, but I wasn’t about to do with these three.
IMG_2747
IMG_2748
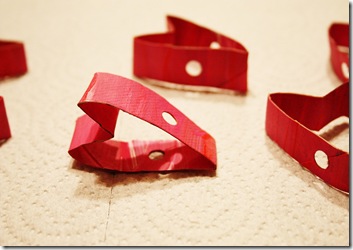
After the paint has dried bend the roll in the shape of a heart.
IMG_2750
Cut the roll into strips about 3/4 of an inch wide.  Use the hole punch to make a hole.  I made mine a tad under the halfway mark.
IMG_2752
Thread your pipe cleaner through the holes on all of the pieces.
IMG_2758
Twist the pipe cleaner together and ta-da, you have one cute decoration and a proud kid.
IMG_2763
This is great for Valentine’s Day or any time you want to make some hearts.  Let’s face it, hearts are cute and a great reminder of love.  Everyone needs some in their life.
Source: @momtriedit.net

Labels

abstract art Accessories Adult English afghan afghan stitch AGULHAS Amigurumi amirugumi applique Art Árvore de Natal em croche baby crochet Baby Dress baby knitting Baby learn bag Bags BAKTUS Ballet Bun Cover balloons BARRADOS basic shapes Bead Beads Bear Ear Hat BEBÊS beehive quilling belts Berry Birds blanket BLUSAS BOINA BOLEROS BOLSAS books BORBOLETAS bows boxes bracelet Butterfly CACHECOL CACHECOLAR cake candles candy Candy Cane card Cards cartoon carving carving fruit carving fruits CASACO INFANTI CASACOS CASAQUINHO EM CROCHE CASAQUINHO EM TRICO CASAQUINHO PARA BEBÊ CHAPEU Christmas quilling clay COLAR COLAR DE FLORES COLETE coloring CORDÃO CORUJUINHAS crafts CROCHE COM SAQUINHOS PLASTICOS CROCHE IRLANDES crochet Crochet Geek crochet pattern cross stitch Curtain cutting paper DECORAÇAO Dicionário de Trico - Inglês/Portugues Doily Doll Dolls - Búp bê drawing Drawing - Vẽ dress earring Easter ECHARPE edging Embroidery Embroidery - Thêu ENXOVAL PARA BEBÉ ESTOLAS fabric FAIXA PARA CABELOS fashion Felt Floral arrangements - Cắm và bó hoa FLORES Flower flower arrangement flower frame flowers crochet Flowers crochet - Móc hoa Folding boxes - Gấp hộp Folding paper FOLHAS food food decor FREE FORM frustration Funny Galaxy Stitch Gang tay - Tất garden gel grips Giầy - Dép gift Gifts glass Gói quà - gấp nơ GOLINHAS Google+ GORRO Gối cho bé GRÁFICOS Granny Square Graphic Quilling hair clip hats Hats - Mũ Heart Hexagon holiday craft holiday crafts home and garden Home decor - Trang trí nhà Hook Insect Itunes Jesus Jesus Christ jewelery jewelry kirigami Knit knitting knitting pattern knot Knot - Tết dây Làm đẹp làm đồ chơi từ gỗ landscape LEAVES Log Cabin Square LUMINÁRIAS LUVAS LUVINHAS PARA BEBÊ Magazine make up making flower making flowers Making toys Manta MANTA PARA BEBÊ MANTA PARA SOFÁ MEUS MOMENTOS MEUS TRABALHOS mittens Móc đường riềm Móc khăn trải bàn motif Multi-strip Multiples Nail art Nature Scenery necklace Nghệ thuật Nghệ thuật cắt giấy Nghệ thuật vẽ trên kính Nhà đẹp Origami Pachwork painting Painting - Sơn màu PANTUFAS PAP Paper paper cut Patchwork PELERINE pictures Pillows Pillows - Gối plastic Play and learn for baby POLAINA poncho Popcorn puff stitch pumpkin cap QUADRADO Quilled animals quilled art quilled berries Quilled design quilled flowers quilled hollow egg quilled leaves Quilled petal Quilled Picture quilled portrait Quilling paper Quilt RECEITA RECEITA CULINÁRIA RECEITA DE PONTOS recycle recycling RENDA DE PELO DE CABRA repair work ribbon rings rugs SACOLAS SAIAS DE CROCHE SANDÁLIAS EM CROCHÊ SAPATINHOS SAPATINHOS PARA BEBÊ Scarf scarves Scarves - Khăn sewing sewing detail shawls shoes and sandals silhouette Singing skirt snood Snowflake soap socks SQUARE Strawberry SUÉTER sweater Swiffer Sweeper Cover TABELAS DE MEDIDAS DE TRICO E CROCHE tablecloths TAPETES. RECEITA TENIS PARA BEBÊ Thank you tip tips TOALHAS TOUCAS TOUCAS PARA BEBÊ TRICO TÚNICA tunisian Tutorial Tutorial video typography underwear Valentine's day Valentines Day vector art Video VÍDEO video tutorial weaving wedding wood XALE YouTube