
Gift presents for women: Triangle Coin Purse With Zipper
Sewing patterns
Materials:
1. Fabric – 2pcs. of 5″ x 5″
2. Lining fabric – 2pcs. of 5″ x 5″
3. Zipper end covers – 2pcs. of 2″ x 1 1/2″
4. Batting – 2pcs. of 4″ x 4″
5. Zipper – 3″ (I used 4″ metal zipper shorten to 3″)
6. Decorative cord or ribbon, approx. 18″
Tools:
1. Sewing machine with normal presser foot
2. Zipper foot
3. Sewing kits
4. Erasable fabric marker
5. Ruler
6. Knitting needle or something blunt but pointy for adjusting the corners
 Cut fabrics & batting according to the dimension above.
For fabric & lining, 5″ x 5″ size is already included 1/2″ seam allowance. Draw sewing lines on the wrong side of the fabrics with fabric marker or pencil.
 Draw a diagonal line on the center of the fabrics with ruler and erasable fabric marker.
 Pin batting on the wrong side of the fabrics. Trim the batting to follow the fabric sewing lines if necessary.
 Stitch diagonally on the right side of the fabric with sewing machine.
Use the presser foot as a guide, sew parallel lines across the entire piece.
 Finished diagonal quilting on both sides of the purse fabrics.
Set aside.
 Cover both zipper’s ends with the 2″ x 1 1/2″ fabrics.
Fold the raw edges on the 1 1/2″ side and sew a narrow hem before covering the zipper’s end.
Fold the 2″ length into half and cover the end (trim the raw edges on the zipper end if necessary), pin to secure the position.
 Change your presser foot to zipper foot, sew on the other 3 sides, except the one across the metal zipper.
Repeat the same to the other end.
 Now you have 2 pcs. of quilted purse fabrics, 2 lining fabrics and a zipper ready for sewing into triangle purse.
 Pin the zipper on the purse fabric with right side together.
Normally, I don’t draw any sewing line on the zipper, I use the grain line on the zipper as a guide, which is normally between 3/8″ to 1/4″ from the center.
Sew on the seam allowance to secure the zipper in place. Remove pins.
 Now, pin the lining on the zipper and purse fabric, with right side together.
Sew on the sewing line with zipper foot. Remove pins.
 Turn the purse fabric and lining down, and zipper up. One side is done.
 Repeat the above 3 steps to the other side of the zipper.
 Bring the purse fabrics together with right side facing each other, do the same to the lining.
Bend the zipper’s edge down to the lining’s side.
Pin both sides of the purse’s fabric and lining.
 Cut 3″ cord as a purse loop and place between the purse fabrics, on the zipper head side.
Sew both side and leave a 2 1/2″ opening on the lining for turning the purse right side out.
Tip: if you want to do make the one on the right hand side of the main photo, sew base and zipper head side. Instead of 2 parallel sewing, it becomes a ” ] “, aka base-side-base.
 Grab the unsewn side (which is the base for this instance), turn the purse with sides meeting at the center. Pin to secure.
Do the same to the lining and bring the lining to the purse fabric.
 Sew both purse fabric and lining fabric together, with lining opening facing up.
 Turn the purse right side out from the opening. It may seems a little too chunky to go through the small opening, as long as you turn each fabric through one by one, you will be fine.
Use knitting needle or something pointy but blunt to shape the corners.
 Fold the balance of the cord into half and stitch the center to the center of the purse bottom.
 Tie a knot or ribbon to the purse loop. Trim the cord to your liking.
A triangle coin purse that looks like a wrapped rice dumpling is completed!
Source: craftpassion.com

 Using these cheap potholders from IKEA and the thrift store:
 So let's get started.
 And you're half-way done! If you prefer making your own potholders, you can use two layers of fabric with quilt batting inside.
  Okay, now grab your 1/2 inch-wide, double-fold bias tape.
 Okay.
Okay. When you get to the bottom of the potholder, sew the two ends of the bias tape together. For this potholder I was lazy and simply sewed a straight line across. In the next potholder below, I sewed the two tapes together in a zigzag line and it created a diagonal finish that matches up with the point of the heart.
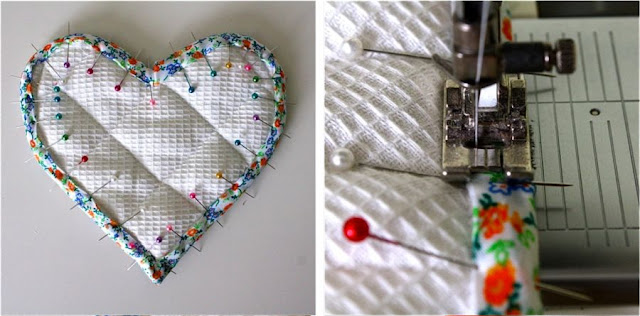
 When you're done, flip the potholder over and fold the bias tape over to the front side. Pin it all the way around and overlap/tuck any excess bias tape in at the top and bottom of the heart. There are more fancy ways to tuck these in but this is the simple, semi-handmade version. I'm all about easy. If pinning doesn't work for you (and keeps poking your fingers), trying holding the bias tape with bendable hair clips--the cheapy kind--you can buy them in the quilting section at a craft store or at Target/Walmart stores.
 Finally, sew the bias tape down on the front side of the potholder. Shift your needle over to the left a bit so you can sew close to the edge of the bias tape. The benefit to sewing bias tape with this method is that you don't have to worry about whether you've sewn through to the back side. Meaning....there won't be any gaps where you might have sewn on the front side but missed the back side of the bias tape....because the back side is already sewn in place! This may sound confusing but once you do it, it'll all make sense.
 And you're done!
 The Cheating way to sew on Bias Tape:
 When you get to the bottom, sew the two ends closed in a zigzag formation. This is the same method used in the Sweater Vest Tutorial. This creates the perfect diagonal casing for the point of the heart.
 When everything is pinned down, sew down the bias tape! Sew as close as you can to the edge and remove the pins one by one right before you get to them. This will help the bias tape sew-down nicer. When sewing around the curves, periodically lift the presser foot to keep the bias tape from folding and creasing.
 If you have a little label, add it in.
 And there you go! Two heart hotpads.
 Because on the front, they both look cute!...and make me want to bake up Coconut-lime Banana Bread.
 I heart bias tape.
 Just had to say it, right?


